Jenkins Home Lab
A guide for building a complete Jenkins home lab
-
Jenkins Home Lab: Part 1 - Setting up the Master
- Jenkins Home Lab: Part 2 - Setting up Linux Agents (Ubuntu & Raspberry Pi systems)
- Jenkins Home Lab: Part 3 - Setting up Windows Agents
- Jenkins Home Lab: Part 4 - On-Demand Linux Agents with Docker
Are you looking for a project this holidays? Did you get a Raspberry Pi for Christmas? Why not setup a home lab for CI/CD with Jenkins? Over the next week or so I’m going to output a series of tutorials aimed at setting up a comprehensive home lab environment for Jenkins. With this home lab you can turn any old or cheap computers into an environment to automate tasks for your side projects, sharpen your CI/CD skills, and prototype new project pipelines.
Overview
I embarked on creating my own home lab to automate tasks on a few side projects as well as a way of filling in some knowledge gaps of mine, specifically aiming to learn windows containers and Docker on ARM architectures, like a Raspberry Pi. As a result this guide is going to cover many different options. I’ve aimed to keep it modular so you can pick how you want to run your master Jenkins server, and choose any or all of the different agents for your environment.
Security Note This guide is focused on a home lab environment so certain security principles will not be rigidly conformed to. I’ll make a note anytime a security assumption or choice is made that should be more carefully considered in a production environment.
Why Jenkins?
There are plenty of CI/CD tools around. Some paid, some free, some cloud hosted, some self hosted. All of these tools have strengths and weaknesses, but in general you can accomplish the same tasks in all of them. I’ve chosen Jenkins for this since it’s free, open source, and incredibly flexible.
Jenkins is written in Java and runs in many environments. It is focused on running user defined tasks and pipelines. This means you can mix architectures and operating systems freely in this setup, all that matters is that your jobs are compatible with an environment available on an agent or slave that you’ve configured.
Jenkins Master requirements & setup options
We’ll be configuring the Jenkins master purely as a tool for coordinating agents, and disabling local execution of jobs. This means that we don’t need a particularly powerful machine to run this on, however this is where job artifacts (built projects) will be stored, so make sure you have enough storage for your intended projects.
I won’t be showing you how to install a JDK, maven and other java related build tools. You can add the build tools and prerequisites to fit your projects and needs later. Ideally once we’ve setup Docker agents your projects will define all prerequisites and dependencies which will be built into the Docker images or installed during the build process.
Where would you like to setup your Jenkins Master?
Click an option below to jump straight to the relevant instructions.
Installing Jenkins on Ubuntu & Raspbian
Installing Jenkins is the same process on Ubuntu and Raspbian, and likely all debian based distributions.
First we add the Jenkins repository to apt, including the associated key.
wget -q -O - https://pkg.jenkins.io/debian/jenkins.io.key | sudo apt-key add -
sudo sh -c 'echo deb https://pkg.jenkins.io/debian-stable binary/ > /etc/apt/sources.list.d/jenkins.list'
Update the repository
sudo apt update
Install the default java runtime and Jenkins
sudo apt install default-jre jenkins -y
Now we need to get the initial password for Jenkins, save the output of this for later.
sudo cat /var/lib/jenkins/secrets/initialAdminPassword
You can now logout from the terminal on the Raspberry Pi and move on to configuring Jenkins.
Installing with Docker
Docker is probably the simplest and lightest way to host a Jenkins master instance as it’s quite literally 2 commands, and upgrading is as simple as recreating the container with a newer image while pointing to the same volume for the jenkins_home directory.
Installing Docker - Quickstart
I won’t cover this extensively, but these are the commands you need to get started quickly. For further configuration information see here for install instructions and here for post-install configuration.
Installing Docker on Ubuntu
Running the below 3 commands will install Docker and set it to automatically start on system boot. Further details on this are available here.
sudo apt install docker.io
sudo systemctl start docker
sudo systemctl enable docker
Running Jenkins Docker Image from Command Line
Running Jenkins in Docker is really simple and can be accomplished in 2 commands.
The image we want to use is jenkins/jenkins:lts. Targeting the Long Term Support release means this release is likely to be more stable, and will be patched for a longer period.
Next up, we can create a place to store persistent data. This makes backup and upgrades easier. The persistent volume is all you need to backup, and upgrading is as simple as recreating the container with a newer image, pointing it to the same persistent volume for jenkins_home. For specific upgrade notes you can always check the upgrade guide.
Command to Create volume
docker volume create jenkins-master-home
Argument to use volume
-v jenkins-master-home:/var/jenkins_home
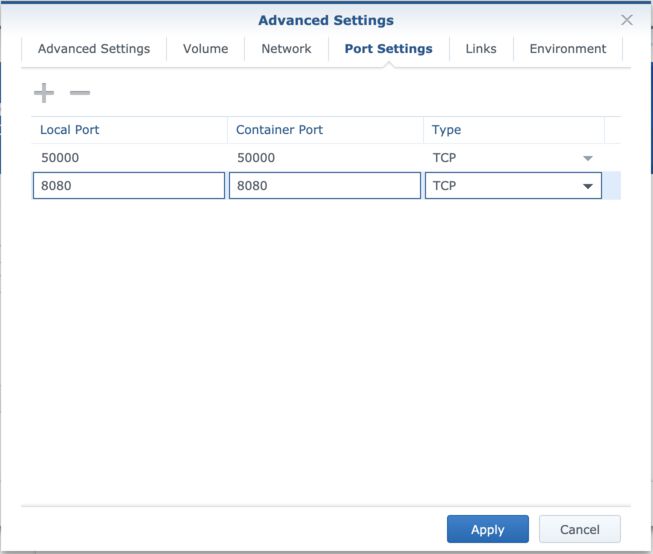
Next, 2 ports need to be exposed to allow access to the webpage and communication with agents/slaves. This is accomplished with these arguments:
Security Note This exposes these ports on the host system so other systems can connect to Jenkins. To be clear these are not being exposed to the internet and in general I’d avoid exposing these to the internet.
-p 8080:8080 -p 50000:50000
The full command lines are:
docker volume create jenkins-master-home
docker run --name jenkins-master \
           --detach \
           -v jenkins-master-home:/var/jenkins_home \
           -p 8080:8080 \
           -p 50000:50000 \
           jenkins/jenkins:lts
You need to get the initial admin password, run this command and save the output for later.
docker exec jenkins-master bash -c 'cat /var/jenkins_home/secrets/initialAdminPassword'
To stop the container run
docker container stop jenkins-master
To start a docker container after the host has rebooted or after it’s stopped run:
docker container start jenkins-master
Now we have a working container, you can move onto initial configuration.
Running the Jenkins Docker image from a Synology NAS
At home I run a Synology DS918+, so being able to host the docker container on this is really convenient. It’s always on, reliable, and already has backup tasks configured, so it’s a perfect place to host it. You can also install Jenkins directly from the Synology Package Center, however running it in Docker will keep it self contained and give you more control over which version you install.
Configuration is mostly straight forward with the exception of a small permission change required on the jenkins_home directory. Unfortunately the synology docker UI doesn’t support docker volumes, and instead uses bind-mounts. This is not ideal, as it usually has some complications around permissions as seen here, but it’s safe and workable.
Security Note Ideally you’d create a jenkins user and group with matching UIDs for a more permanent solution. It’s clearer to manage than raw UIDs.
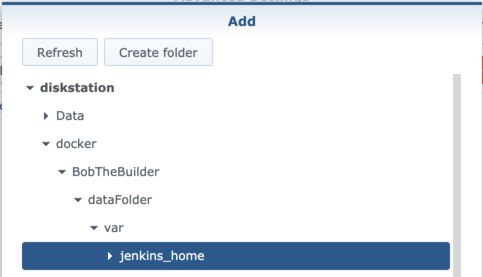
Create a directory somewhere on your NAS, for me it’s in a Shared Folder dedicated to Docker.
SSH into your NAS
ssh user@nashostname
Change permissions on the folder to be owned by user and group 1000
sudo chown -R 1000:1000 /volume1/docker/JenkinsMaster/dataFolder/var/jenkins_home
Exit the SSH session. We are now ready to setup the container on the Synology NAS.
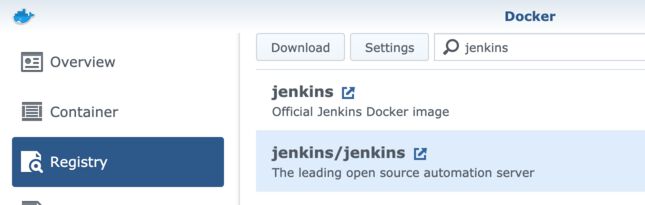
Search the registry for the jenkins/jenkins image
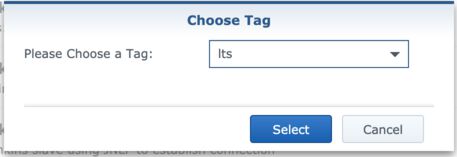
Download the Jenkins image with tag LTS
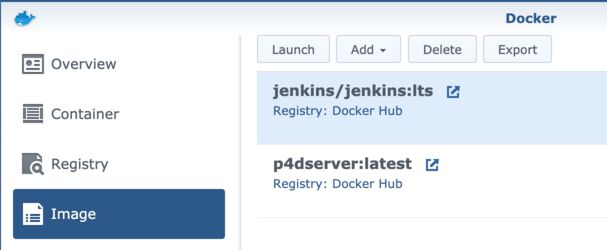
Create the container by double clicking the image
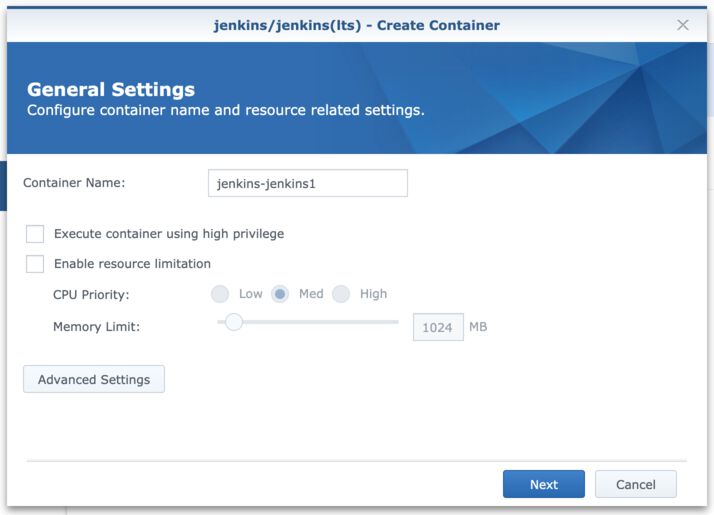
Enter a name for the container and then enter Advanced Settings
Expose the ports
Map the jenkins_home folder by clicking Add Folder and selecting the folder you created previously.
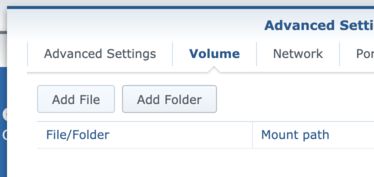
Enter the mount path as
/var/jenkins_home
Apply the advanced settings and continue with container creation
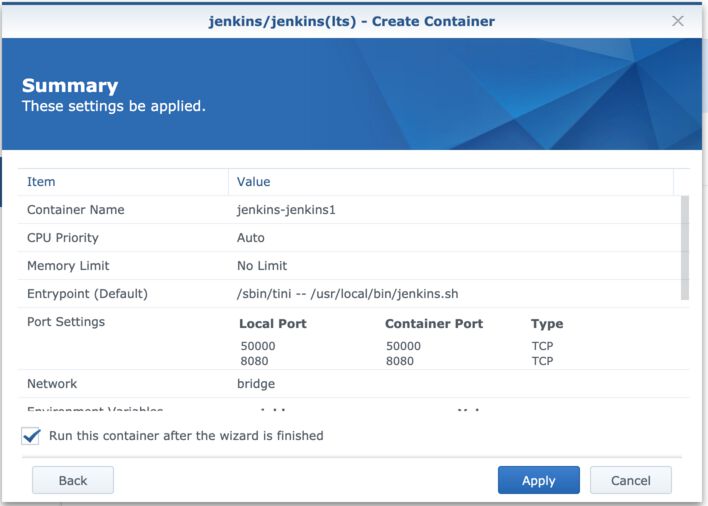
Press apply and the container will start up.
To get the initial password we need to connect a second terminal to this instance and run a command. Click the new container and click details.
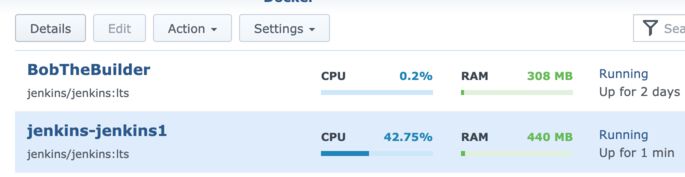
Once in the running container details, click Terminal, and then Create. Click on the newly created terminal, labelled bash.
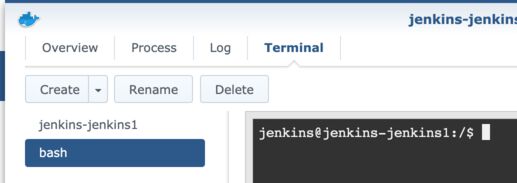
Run the command
cat /var/jenkins_home/secrets/initialAdminPassword
Copy the output of this command, as this is the initial password we will need when logging into Jenkins.
Run the exit command to close this terminal
exit
You can now close the container window and proceed to configuring Jenkins.
Configuring the Jenkins Master
You can now access jenkins at http://HOSTNAME-OR-IP:8080 in your browser.
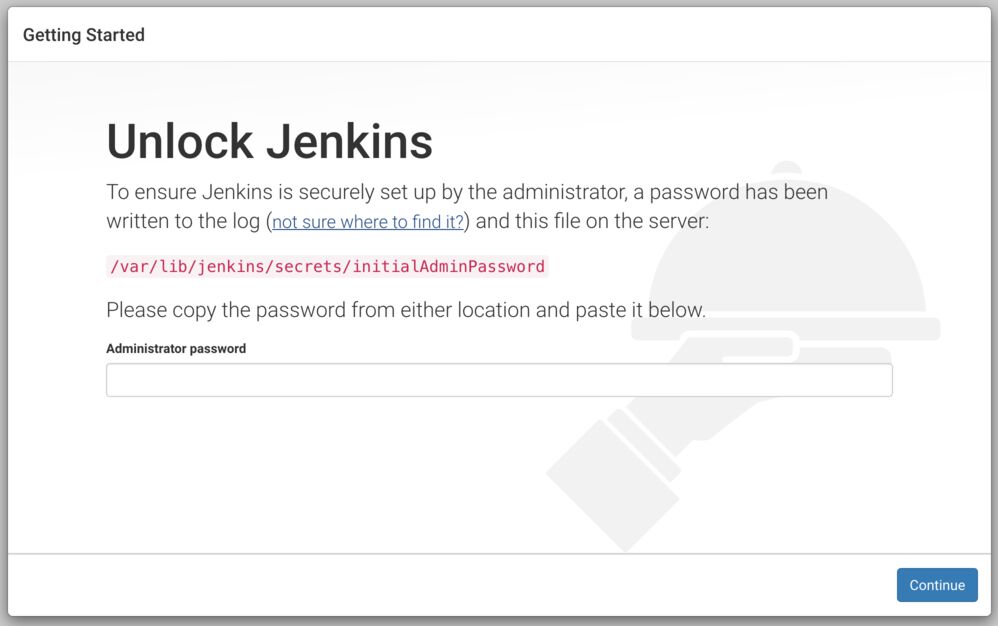
Initial Login
Enter the password that we captured from the file at /var/jenkins_home/secrets/initialAdminPassword after installing Jenkins.
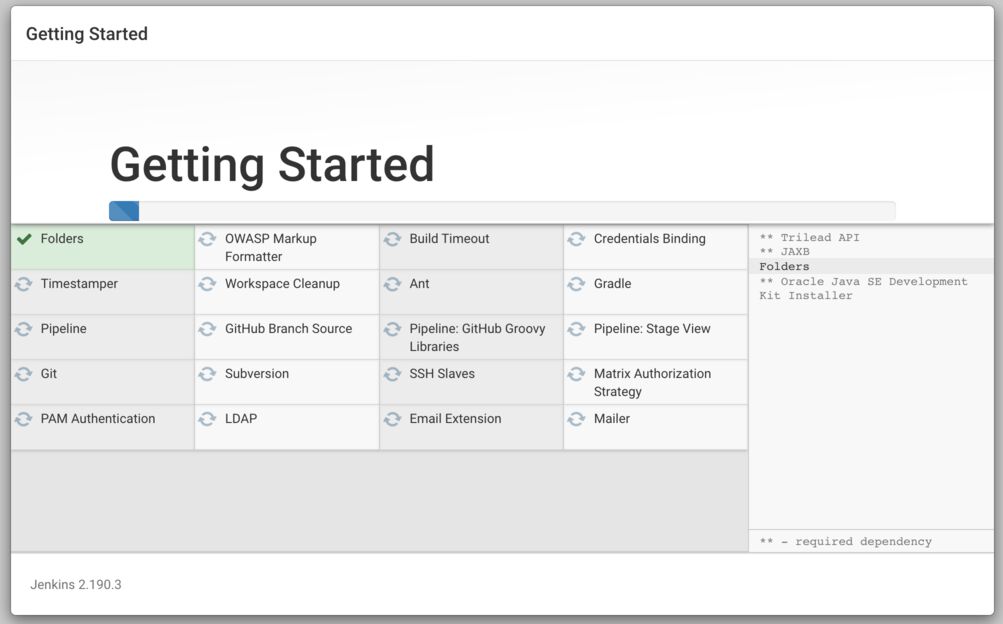
Plugins
I recommend just installing the recommended plugins first up. You can always add or remove plugins later.
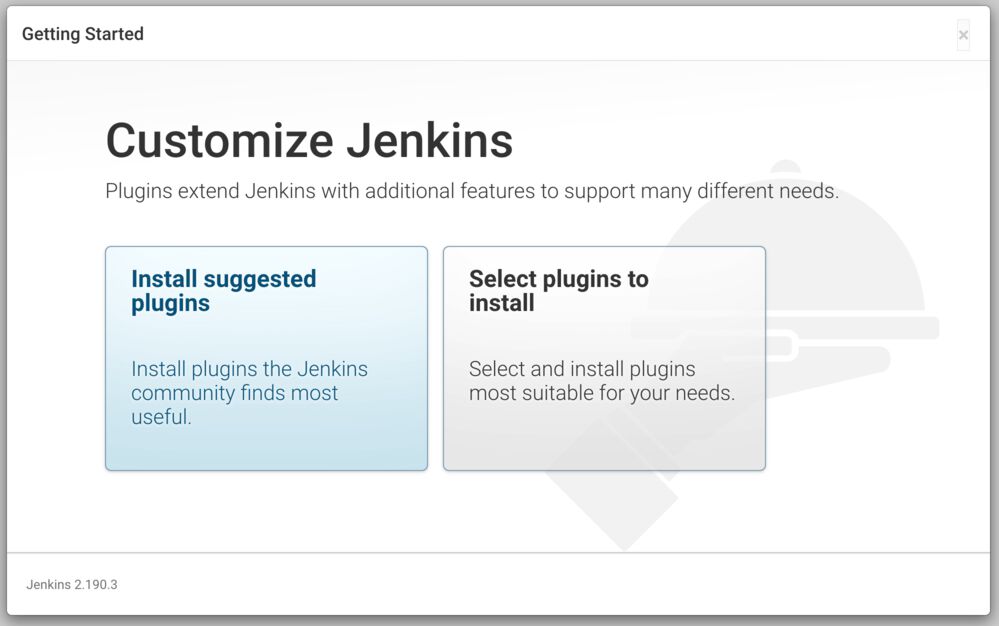
This will take a while to download depending on your internet speed and system.
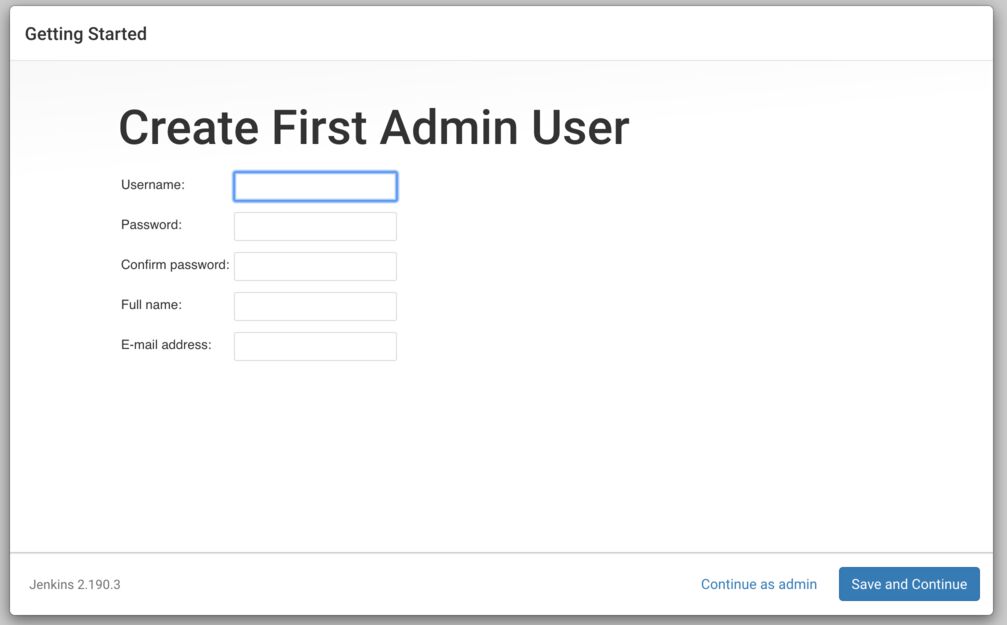
Create Admin User
Security Note In a home lab generally you’ll only configure 1 or 2 users, however you should always follow the principle of least privilege, especially since jobs will likely have access to credentials for other systems and services, and an error in code could have unintended effects. Appropriately planning access will allow you to create users that can run jobs but not access or modify credentials and jobs. Plan your access appropriately. Read the Jenkins handbook section on Securing Jenkins here.
Enter the details for your main admin user.
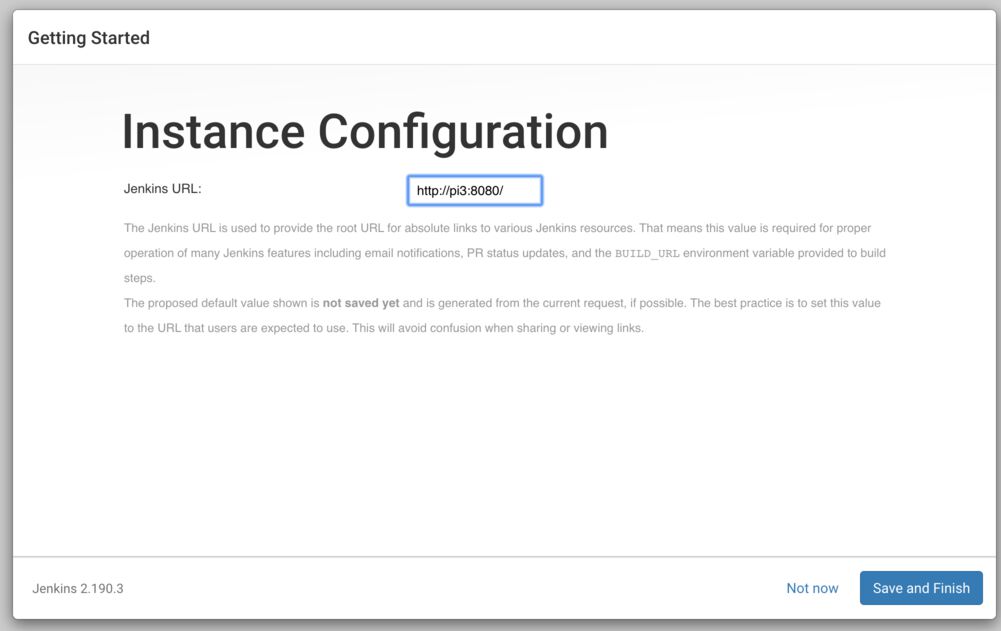
Instance Configuration
Unless you are planning on renaming the host, or adding a custom DNS entry for this server then the default setting is probably ok.
Wizard Finished
Congratulations, you now have a Jenkins master installed. We still should perform a few configuration tasks on this since we have a larger setup planned. I like to keep the master node as clean as possible so i don’t like running jobs on this instance, so lets go ahead and disable those.
Disable jobs on this node
It is best practice to not build on the master node. This is more secure and reduces long term issues including performance and conflicting dependencies. It’s easier to wipe and recreate an agent than to fix or clean the master system.
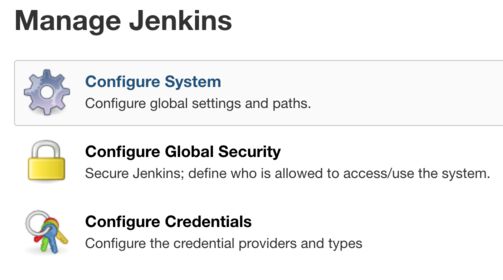
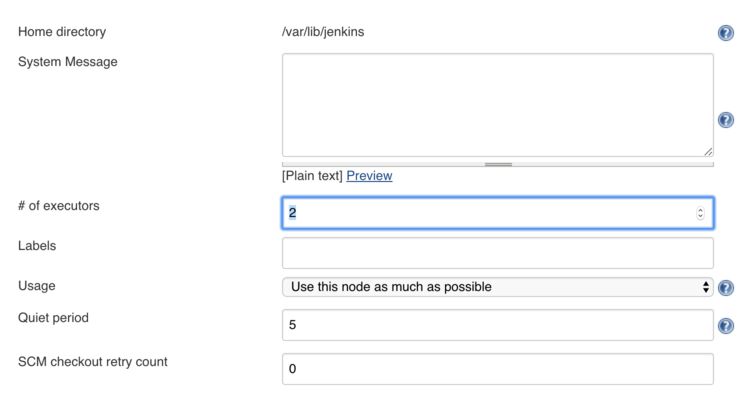
In the left hand menu on the side enter Manage Jenkins, and then enter Configure System. This page can be slow to load, be patient.
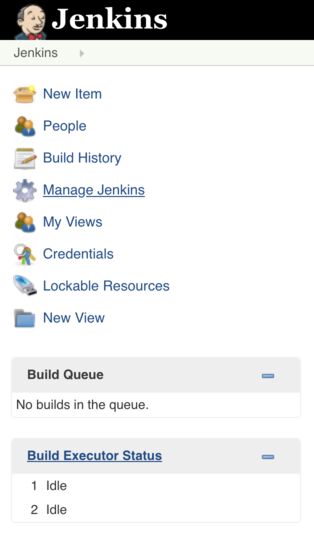
In here change “# of executors” to 0 and click Save. This is the number of jobs that can be run concurrently on the master node, not the number of agents that will eventually connect.
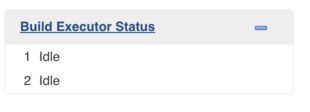
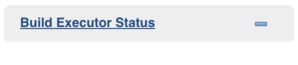
Once this is applied the Build Executor Status box on the left will now be empty.
Before:
After:
What’s Next?
Now we have a configured Jenkins Master node we are ready to add some agents to perform some actual work for us which I’ll cover tomorrow. In the meantime, you may want to consider setting up email notifications.
Email notifications aren’t essential for a home lab, however I recommend spending some time setting them up as it’s nice to know when jobs fail. All the relevant settings are also under Manage Jenkins->Configure System. Here are some instructions.
Tomorrow I’ll cover configuring linux SSH agents. This will involve setting up an SSH key, installing java, and configuring Jenkins to remotely start the agent. This is a good method to use for VMs, a Raspberry Pi and other bare metal linux systems.
Continue on with Part 2 - Setting up Linux Agents on Ubuntu and Raspberry Pis
Share